Uninstalling Exchange 2010 after migrating to Exchange 2013

Remove exchange 2010 after upgrading the current environment to exchange 2013

Please ensure,

  •  All Client Access server FQDNs are pointing to Exchange 2013.
  • All mail flow connectors are pointing to Exchange 2013.
  • All user and arbitration mailboxes have been moved to Exchange 2013.

Move Arbitration and Discovery Search mailboxes
Follow the below steps to move all arbitration and discovery search mailboxes to final 2013 database.
Open EMS with run as administrator and run the following cmds
Get‐Mailbox –Arbitration | New‐MoveRequest –TargetDatabase TargetDBName
Get-Mailbox “*Discovery*” | New‐MoveRequest  –TargetDatabase TargetDBName

  • If you were using public folders, make sure the public folders databases have been migrated to Exchange 2013.
  • Any Exchange 2010 CAS arrays you have configured must be removed.
  • Make a list of applications that may be using Exchange 2010 and then make sure to configure these applications to start using Exchange 2013 if necessary.

http://technet.microsoft.com/en-us/library/ee332361(v=exchg.141).aspx

Completely remove exchange from the environment, “In addition to removing exchange 2010 via Control panel > add or remove programs ”

Check if the exchange related objects are removed from AD, if it’s not removed then try to remove them manually.

  1. Go to Primary Domain Controller
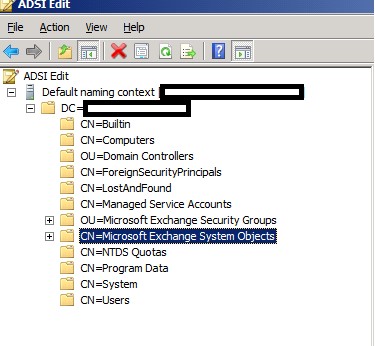
  2. Open ADSIEDIT
  3. Right Click on ADSIEdit and Click Connect to
  4. Connect to “Default Naming Context”
  5. Navigate to the following objects and Delete them.

DC=Domain,DC=Com -> OU=Microsoft Exchange Security Groups

DC=Domain,DC=Com -> CN=Microsoft Exchange System Objects

  1. Right Click on ADSIEdit and Click Connect to
  2. Connect to “Configuration”
  3. Navigate to the following objects and Delete them.

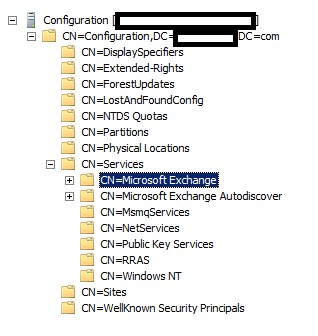
CN=Configuration,DC=Domain,DC=Com -> CN=Services -> CN=Microsoft Exchange

CN=Configuration,DC=Domain,DC=Com -> CN=Services -> CN=Microsoft Exchange Autodiscover

  1. Force the Active directory Replication.
  2. Exchange 2010 Manual Uninstallation is Completed

pic1

pic2


Feel free to post in for your comments and feedbacks

Regards,

Ganesh G
Solution for Outlook Auto mapping – Exchange 2010 SP2 and above

Solution for Outlook Auto mapping – Exchange 2010 SP2 and above

 For Specific OU Users

  1. Created a OU named “Automap” and added two users to it named “Manisha Tunk ” & “Pramod”.
  2. Administrator is the user who has full access on both the mailbox in this Automap OU.
  3. Now our action plan is to remove auto mapping for the administrator , to avoid those two profiles being added to the administrator’s outlook when its loaded.
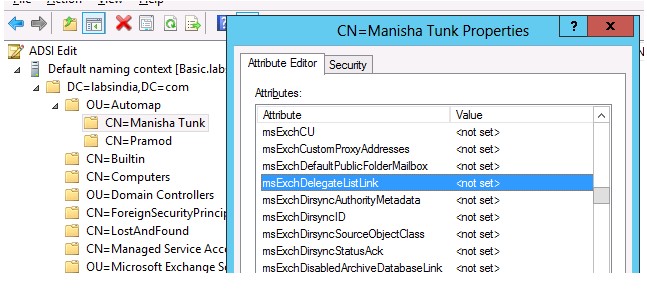
  4. The attribute which is working behind automapping is “msExchDelegateListLink”, it has the list of users who have fullaccess on the mailbox.
  5. So we can either set this attribute to null or we can just follow the below steps to remove automapping via exchange powershell (Only applicable for Exchange 2010 SP2 and above), Same is available here – Technet   

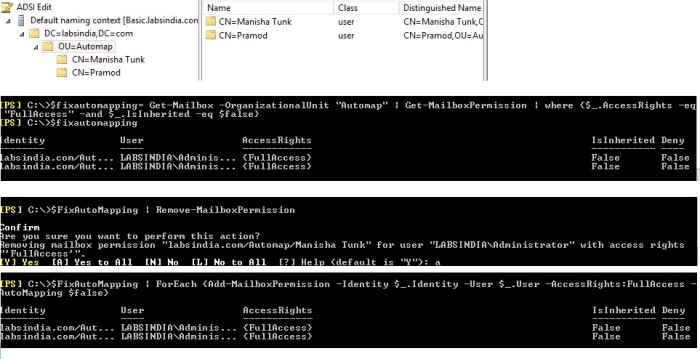
Auto1


Auto2


For all the users in the Org to remove auto mapping for a user named “Administrator”

Below command just gives the user “Administrator” full access to all the mailboxes, Here by default Automapping is set to true,

I.e., msExchDelegateListLink has this value added to the respective mailboxes

Auto3


When the administrator opens the Outlook,Now outlook will display all the mailbox on which the administrator has full mailbox access,Most of them doesn’t want this to happen,

Hence we tweak “-automapping” value to be false

Auto4


Below command adds full mailbox access to the user “Administrator” and disables the automapping

Get-Mailbox | % {Add-mailboxpermission -user “Administrator” -accessrights “FullAccess” -identity $_ -Automapping $false}


Auto5


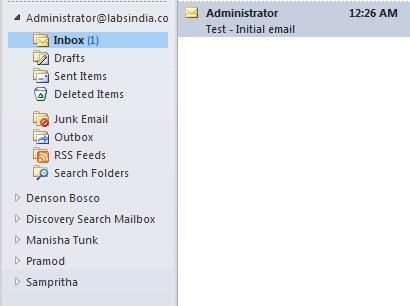
Now find the administrator’s profile below,

Auto6


Profiles are not automapped, as we have set the automapping to $false

Post in your feedback/queries/and what ever you want to say about this piece of info 🙂

-Ganesh G

Delete items from multiple mailboxes in 2010 using EWS

$MailboxName = ‘Name@Mailbox’

$dllpath = “D:\EWS\Microsoft.Exchange.WebServices.dll”
[void][Reflection.Assembly]::LoadFile($dllpath)

$Service = New-Object Microsoft.Exchange.WebServices.Data.ExchangeService([Microsoft.Exchange.WebServices.Data.ExchangeVersion]::Exchange2010_SP1)
$Service.AutodiscoverUrl($MailboxName,{$true})

$RootFolderID = new-object Microsoft.Exchange.WebServices.Data.FolderId([Microsoft.Exchange.WebServices.Data.WellKnownFolderName]::Root,$MailboxName)
$RootFolder = [Microsoft.Exchange.WebServices.Data.Folder]::Bind($Service,$RootFolderID)

$FolderView = New-Object Microsoft.Exchange.WebServices.Data.FolderView(1000)
$FolderView.Traversal = [Microsoft.Exchange.WebServices.Data.FolderTraversal]::Deep

$Response = $RootFolder.FindFolders($FolderView)

ForEach ($Folder in $Response.Folders) {
if($folder.DisplayName -eq “AName”) {
$folder.delete([Microsoft.Exchange.WebServices.Data.DeleteMode]::SoftDelete) } }