Move Schema master role from one DC to the other using ntdsutil
you can trace the commands from the below screenshots,

Schema master is moved to Con-Clt-Dc1
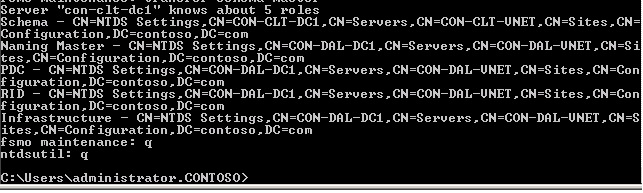
You can verify the same using netdom Query fsmo

Regards,
Ganesh G
Move Schema master role from one DC to the other using ntdsutil
you can trace the commands from the below screenshots,
Schema master is moved to Con-Clt-Dc1
You can verify the same using netdom Query fsmo
Regards,
Ganesh G
Cross Site DAG / DAC Mode – Scenarios
Here is a scenario where in we have a cross site DAG and we have the core discussion on how it works during a disaster (WAN down , Primary site down).
So please go though this and post me with your feedback and corrections if any,
If you wish to add more to this please feel free to add to it
Environment:
Two Sites
Primary – 10 database and copies
2 CAS/HUB
5 MBX – 1 witness
DR – Copies
5 MBX and 2nd witness (alternate witness)
2 CAS/HUB

1 DAG – 10 Databases
Research:
Primary Site:
2 CAS/HUB – Primary Witness
5 MBX – 1 witness
Secondary Site:
5 MBX and 2nd witness (Alternate witness)
2 CAS/HUB
Based on the current deployment where we have 2 sites and identical number of nodes (cluster-wise) on both sides, what would happen if the link goes down while servers are still up?
Scenario 1: You have two sites and the WAN link between the sites goes down,

One DAG with 10 members and 10 databases,
WAN link between the sites goes down (DAC doesn’t come into picture)
Note: If AD replication between the sites are fine, then the databases will be failed over to the primary site, else database will be dismounted on the DR site and we need to manually use the command to mount them on the Primary site,
Move-ActiveMailboxDatabase <Database Name> -ActivateOnServer <target server>
Scenario 2:
a. Primary Site goes down – DAGONLY (Dac mode is turned on)
Datacenter Activation Mode is a mode specifically for multisite Data Availability Groups with 3 or more members.
It is there to stop datacenter DAG split brain syndrome with the help of a protocol called “Datacenter Activation Coordination Protocol (DACP)”
DAC operates this using literally a bit that it flips 0 or 1. “0” meaning it cannot mount a database and upon talking to other DAG members using DACP and finding another server with 1, will mount the databases as it knows it is allowed to.

Stop-DatabaseAvailabilityGroup -Identity DAG1 -ActiveDirectorySite <Primary Site> –ConfigurationOnly
5. Stop DAG members,
Stop-DatabaseAvailabilityGroup -Identity DAG1 -MailboxServer <DAGmembersinPrimarySite> –ConfigurationOnly
6. Restore Dag on the DR site using the following command,
Restore-DatabaseAvailabilityGroup -Identity DAG1 -ActiveDirectorySite <DR Site> -AlternateWitnessServer <HUBServer> -AlternateWitnessDirectory <WitnessDirectory Path>
The Restore-DatabaseAvailabilityGroup cmdlet performs several operations that affect the structure and membership of the DAG’s cluster. This task will:
7. Mount the database on the DR Site,
Move-ActiveMailboxDatabase -Server <DAGMemberinPrimarySite> -ActivateOnServer <DAGMemberinDRSite> -SkipActiveCopyChecks –SkipClientExperienceChecks –SkipHealthChecks -SkipLagChecks
Scenario 3:
When the DAG isn’t in DAC mode, the specific actions to terminate any surviving DAG members in the primary datacenter are as follows:
net stop clussvc
cluster <DAGName> node <DAGMemberName> /forcecleanup
Stop the Cluster service on each DAG member in the second datacenter by running the following command on each member:
net stop clussvc
net start clussvc /forcequorum
When the DAG isn’t in DAC mode, the steps to complete activation of the mailbox servers in the second datacenter are as follows:
If there’s an odd number of DAG members, change the DAG quorum model from a Node a File Share Majority to a Node Majority quorum by running the following command:
cluster <DAGName> /quorum /nodemajority
Set-DatabaseAvailabilityGroup <DAGName> -WitnessServer <ServerName>
net start clussvc
Move-ActiveMailboxDatabase -Server <DAGMemberinPrimarySite> -ActivateOnServer <DAGMemberinSecondSite>
Get-MailboxDatabase <DAGMemberinSecondSite> | Mount-Database
More information on DAC:
How DAC mode works : http://technet.microsoft.com/en-us/library/dd979790(v=exchg.141).aspx
Understanding DAC : http://technet.microsoft.com/en-us/library/dd351049.aspx
Regards,
Ganesh G
I always keep this link handy and its worth sharing!
=====================================================================
#Script to Get the member counts in all DL which are enabled for receiving external emails
#Start Script
Start-transcript C:\Results_DLMembercount.txt
$DistGrp = Get-DistributionGroup -resultsize “Unlimited” | where {$_.RequireSenderAuthenticationEnabled -eq “True”}
Foreach ($DistGrp in $DistGrp)
{
$DLName = $DistGrp.DisplayName
$Members = Get-DistributionGroupMember “$DistGrp”
$Count = $Members.count
$Count = “$DLName” + “ = “ + “$Count”
$Count
}
Stop-Transcript
#End of Script
==============================================================
Solution for Outlook Auto mapping – Exchange 2010 SP2 and above
For Specific OU Users


For all the users in the Org to remove auto mapping for a user named “Administrator”
Below command just gives the user “Administrator” full access to all the mailboxes, Here by default Automapping is set to true,
I.e., msExchDelegateListLink has this value added to the respective mailboxes

When the administrator opens the Outlook,Now outlook will display all the mailbox on which the administrator has full mailbox access,Most of them doesn’t want this to happen,
Hence we tweak “-automapping” value to be false

Below command adds full mailbox access to the user “Administrator” and disables the automapping
Get-Mailbox | % {Add-mailboxpermission -user “Administrator” -accessrights “FullAccess” -identity $_ -Automapping $false}

Now find the administrator’s profile below,

Profiles are not automapped, as we have set the automapping to $false
Post in your feedback/queries/and what ever you want to say about this piece of info 🙂
-Ganesh G
Found this useful for deploying Exchange 2013
Excellent article to troubleshoot 404 error in Exchange 2013
Offline Address Book – Understanding
Let’s first go back to our good old days from where the OAB concepts originated,
The offline address book is a snapshot of the Active Directory service information that is available in the global address list. Therefore, some information is available in the global address list that is not available in the offline address book. The offline address book does not contain the following items that are available in the global address list:
Outlook must be able to access the server to obtain this
information. Therefore, if you are in cached mode and if you are working online(that is, your connection status indicates “Connected”), Outlook uses both the offline address book and the global address list to provide a complete listing of user information. If you are in cached mode and if your connection status shows either “Disconnected” or “Offline,”you can see only the information thatis available in the offline address book.
Exchange 2003 days, Definition as per TechNet (So nothing i need to talk from my perspective 🙂 )
Offline Address Book provides offline access to directory information from the global address list (GAL) and from other address lists, each night, Exchange generates new offline address book files and places them in a special public folder, known as a system folder, for Outlook to download. The offline address book files are compressed before they are added to the offline address book system folders so that the download to Outlook is minimal. Outlook is scheduled to check periodically for new offline address book files in these system folders, and download the required files.
Exchange Server and Active Directory work together to maintain the offline address book, keeping it synchronized with changes that may be made in the directory.
Generated OAB will be stored in the public folders for the users to download. System attendant service was responsible for the generation process.
Components involved in the generation process are,
System attendant call the Oabgen.dll
In turn the oabgen (MAPI Application) read the Active directory and creates OAB Version 2, OAB Version 3a, and OAB Version 4 folders.

Exchange 2k3 Offline address lists are stored in two locations
1. The Active Directory
2. The Microsoft Exchange Public Folder Information Store.
Exchange 2k7/E2k10 Offline address lists can be stored in three
locations
1. The Active Directory
2. The Microsoft Exchange Public Folder Information
Store.
3. File Structure \\MBX Server \ExchangeOAB\GUID
Exchange 2013, those are stored in Arbitration mailbox and CAS
As there are numerous articles on the internet which talks about the Distribution part, Below are few for your ref,
This article is from the OAB Guru DGoldman,
Post in ur queries, lets learn from each other 🙂
Ganesh G
Just a Quick look at the changes made in Exchange 2013 with respect to the Offline address book,
Older versions of exchange had One Generation server (Mailbox server), But this is discontinued in Exchange 2013, Instead Organization mailbox or Arbitration mailboxes are brought into picture.
Get-mailbox -arbitration | where {$_.PersistedCapabilities -Like “*oab*”}
Quick work flow,
How it works in Exchange 2013 :
Key points to note:
During the First Request from the client
Arbitration mailbox copies the oab in to the CAS fodler,
Going further all the connections are made to the path where the oab is placed in CAS,
Then in case of rebuild use
Update-offlineaddressbook
Set-mailbox <Mailbox identifier> -arbitration -oab $true (Create a new arbitration mailbox)
Specify a oab for a mailbox
Set-mailbox “mbx name” -Offlineaddressbook <Oab name>
“MSexchangeuSeoab” attribute to be set
More detailed information is available in the below links, Feel free to post in your queries here i will try my best to answer your questions, Have a good one !
http://blogs.technet.com/b/exchange/archive/2012/10/26/oab-in-exchange-server-2013.aspx
$MailboxName = ‘Name@Mailbox’
$dllpath = “D:\EWS\Microsoft.Exchange.WebServices.dll”
[void][Reflection.Assembly]::LoadFile($dllpath)
$Service = New-Object Microsoft.Exchange.WebServices.Data.ExchangeService([Microsoft.Exchange.WebServices.Data.ExchangeVersion]::Exchange2010_SP1)
$Service.AutodiscoverUrl($MailboxName,{$true})
$RootFolderID = new-object Microsoft.Exchange.WebServices.Data.FolderId([Microsoft.Exchange.WebServices.Data.WellKnownFolderName]::Root,$MailboxName)
$RootFolder = [Microsoft.Exchange.WebServices.Data.Folder]::Bind($Service,$RootFolderID)
$FolderView = New-Object Microsoft.Exchange.WebServices.Data.FolderView(1000)
$FolderView.Traversal = [Microsoft.Exchange.WebServices.Data.FolderTraversal]::Deep
$Response = $RootFolder.FindFolders($FolderView)
ForEach ($Folder in $Response.Folders) {
if($folder.DisplayName -eq “AName”) {
$folder.delete([Microsoft.Exchange.WebServices.Data.DeleteMode]::SoftDelete) } }
Food is our official language
Wat more you want
The Art and Craft of Blogging
The latest news on WordPress.com and the WordPress community.
